
Rear bumpers
Both sets of bumpers had been trial fitted before the bodyshell went off to the paint shop, so I wasn’t expecting any issues fitting them. For once, this turned out to be the case with the rear bumpers!

Comparison of S1 (top)
& S2 rubbers
The rear bumpers were fitted a while back as they needed to be in place before the two rear light clusters. Or more accurately, they just had to be in-situ otherwise the vertical fixing bolts cannot be fitted once the rear lights are on. Similarly the overrider bolts have to be in-situ when the outer quarter sections are bolted on.
The outer quarter sections were fitted first but just hand tight so that they could still be adjusted once the centre section was added. The final tightening waiting until the rubber was in position.
The tweaks to the rear end aesthetics continued by fitting the much thinner S1 rear bumper rubber rather than the S2 rubber, which seems unnecessarily thick and unsightly. Fitting the bumper rubber to fill the gap to the body proved to be the hardest part. It has to be fitted in a single run as the overriders are shorter than the full depth of the bumper, and therefore can’t be used to hide a joint.
| Plenty of protective masking tape! | Quarter sections fitted first | Overrider bolt needs to be in place |
|---|---|---|
 |
 |
 |
A notch had to be taken out of the underside (not seen) section of rubber to enable it to go round the tight curvature at the ends of the outer quarter bumpers. However the main problem was as the various bolts were tightened. The ever decreasing gap to the body caused the rubber to either pop out or ruffle up.
| Aligned & centred, awaiting rubbber | Locating notch to take out of rubber | Completed rear bumpers with overriders |
|---|---|---|
 |
 |
 |
The rear bumpers were completed by the addition of the overriders and their thin strips of rubber.
Front bumpers
Unfortunately the same could not be said for the front bumpers! The first task was to re-tap the four mounting holes as their threads had been clogged with overspray.
The thinner S1 bumper rubber was carried over to the S2 front bumpers and were held in place by a metal clip at each end. Although I used a small dab of superglue instead. Again the two outer quarter sections were loosely fitted first, followed by the centre section.
| The mounting holes needed re-tapping | Yet more protective masking tape! |
|---|---|
 |
 |
However I couldn’t get the centre section to slot neatly into the RH quarter bumper, thinking it must be due to a horizontal alignment problem. After a lot of head scratching and standing back to check the alignment, the cause became clear. The RH quarter was drooping downwards at quite an angle.

Damage to bonnet panel
On closer inspection the inner most mounting bracket was found to be bent. At some point, it must have been involved in a front end knock. But worse than that, the retaining nut on the new bonnet has been welded set back from the bonnet panel by quite some distance and also pointing slightly downwards.
This and over-tightening due to using a ratchet spanner has resulted in the panel being deformed. I’m really kicking myself for not using normal spanner and taking a bit more care!
The annoying part is the bumpers had allegedly been fitted before the body was painted and the bumpers re-chromed. So I would have thought the alignment/bent bracket would have been spotted. At least the panel damage will be hidden from view once the bumper is on …. although it will bug me, as I know it’s there!
I think the best solution will be to fabricate a pair of matching chamfered washers. However this will have to wait until after the MOT, which is only days away! Bumpers aren’t required for an MOT so I’ve got plenty of time to address the problem.
Rear Number Plates
Framptons had been chosen to supply suitable period front and rear number plates. The original square plates at the rear were being replaced with a more typical oblong shaped plate, to enable straight exhaust pipes to be fitted rather than the splayed type.
Other changes were the dropping of the number plate mounting bracket (specifically designed for a square plate) and the stainless steel rear finishing panel.
| Rear plate fits between reverse lights …. just!! |
Characters start to be obscured when viewed from a height |
|---|---|
 |
 |
Fortunately the registration number is quite short so, by making the plate as narrow as legislation would allow, it could be mounted directly to the car body between the two reversing lights.
The vertical positioning of the top of the plate was made the same as it had been originally. However, without the number plate bracket, the plate is mounted further inboard, causing the bumper to partially obscure the top of the plate when observed from more lofty (camera!) positions.

Quite pleased with the revised rear
The local MOT tester indicated he was happy with the location as it just has to be visible directly from the rear.
In this position the lower inch or so protrudes below the vertical body panel. The aluminium number plate chosen is only little over 1mm thick and so the lower edge would be prone to accidental damage.
To avoid this, it was first mounted to a piece of 4mm acrylic sheet. Everything being held on with double sided number plate tape.
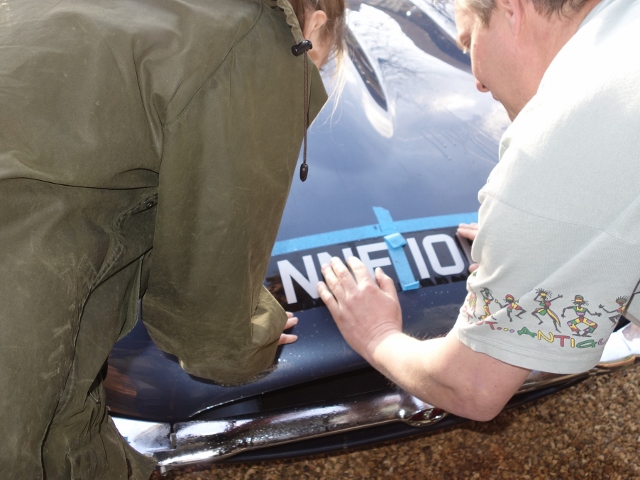
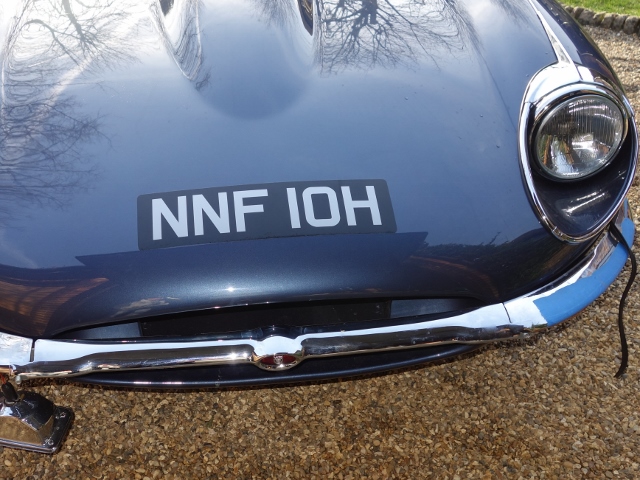
Front Number Plates

Horizontal & centre guide tapes
I was a lot more apprehensive about mounting the stick-on number plate to the bonnet! Some time was spent marking out a horizontal length of masking tape approx 15.5cm below the bonnet bulge to act as a guide.
For the front, I’d opted for silver characters on a black background. The characters had been applied centrally to what I assume was a standard sized adhesive background. Therefore there was a lot of black space at either end due to the short registration number. The first job was to trim each end by approx 3.5cm and recreate the curved corners.
The centre line of the car was marked on the guide tape and the corresponding centre of the plate marked with a strip of masking tape.
| Initial placement once sprayed with soapy water |
Fine adjustments can easily be made at this stage |
Finally excess water was squeezed out |
|---|---|---|
 |
 |
 |
The fixing advice was to give both the bonnet and the adhesive side of the plate a generous spraying with soapy water (a squeeze of washing-up liquid in a pint of water). Then place the plate in position, trying to avoid trapping air bubbles.
While there was a film of soapy water between the plate and bonnet, there was plenty of time to manoeuvre it into its final position. It was only once the water was squeezed out, working from the centre out, using a soft cloth, that the number plate became semi-fixed in position.
Using masking tape to mark the centre of the plate wasn’t such a good idea. It tended to lift the plate when it was removed. It would have been better to wait until it was completely dry and firmly stuck before removing the tape …. or just memorise where the centre line is on the plate!
 |
 |
In the end, fitting the front number plate wasn’t as nerve racking or difficult as I’d imagined. Although I did have my trusty niece to assist with the difficult bits!
Boot badges

Finishing touches – boot badges
Even the simple task of mounting the boot badges took longer than expected. The retaining nylon cups were pressed into the holes in the boot but there was no way the legs of the badges could then be pressed into the cups.
A little heat was applied to make the cups more pliable, without success. The only way I could get them to fit was to drill out the cups, one drill size smaller than the badge legs. I’m sure I’d been sent the wrong sized cups!
No matter how simple a task, it was quite satisfying putting on the finishing touches.


 The intention had always been to paint the inside surfaces to provide better protection from the elements. So I decided to keep the new, rusty rear bumpers.

