Jun 282016
 

The car was delivered to Suffolk & Turley in early June for the hood fitting. Hurrah! Just before it went, a fellow restorer, John, and his son dropped in and we had a very pleasant natter about our respective restorations and the problems encountered. He was over in the UK all the way from South Africa. I take my hat off to him as he’s currently restoring both a S1.5 OTS and a S2 FHC.

John’s primrose yellow S2 FHC – it makes me want to do another one!

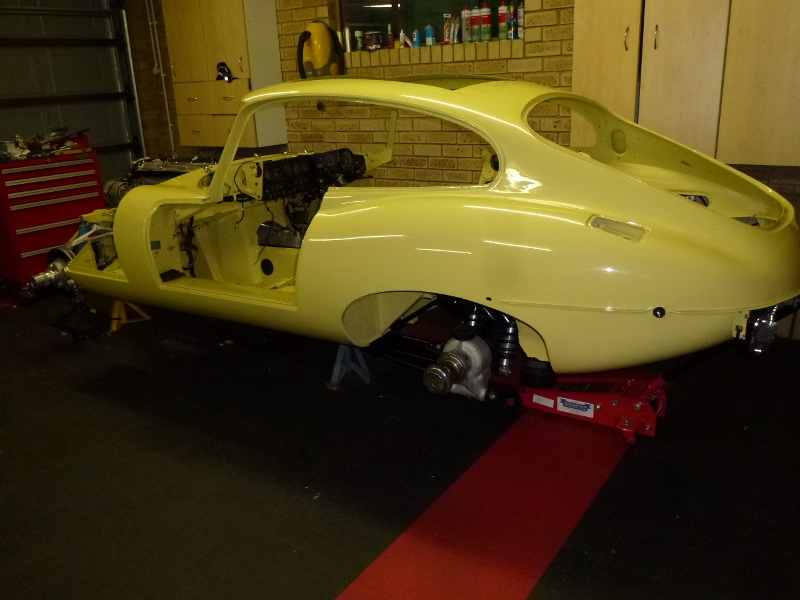
It’s bad enough securing parts while based in the UK, with incorrect or poor-fitting parts often being delivered. Planning a restoration from so far afield from the usual parts suppliers must be a logistic nightmare. By chance I’d accumulated a couple of spare parts which John was looking for.

The delivery to Suffolk & Turley was not without incident. One thing I hadn’t done since it passed its first MOT was to confirm the speedo was calibrated correctly. Travelling in tandem enabled various test to be made en route. The plan was to have the lead car sit at various speeds (50mph, 60mph & 70mph) while I matched their speed and checked my speedo reading. Using a GPS would be more accurate due to the inaccuracies of speedos but it would be sufficient for now. Speedos are typically calibrated to read between 0-10% higher than the true speed, with most around 5% over.

However the results were quite alarming – following at 70mph, my speedo was only reading 56mph! Reading 20% lower than it should, so travelling at an indicated 70mph would equate to almost 88mph (ooops!). I had always thought it felt quite a bit faster than it was indicating and had put this down to a similar feeling driving my Elise. Being so low to the ground heightens the sense of speed. At least now I know to factor in the inaccuracy until it can be calibrated ….

…. that was until a few miles from their workshop on the outskirts of Nuneaton, when a whining noise started coming from the gearbox immediately followed by the speedo packing up completely!

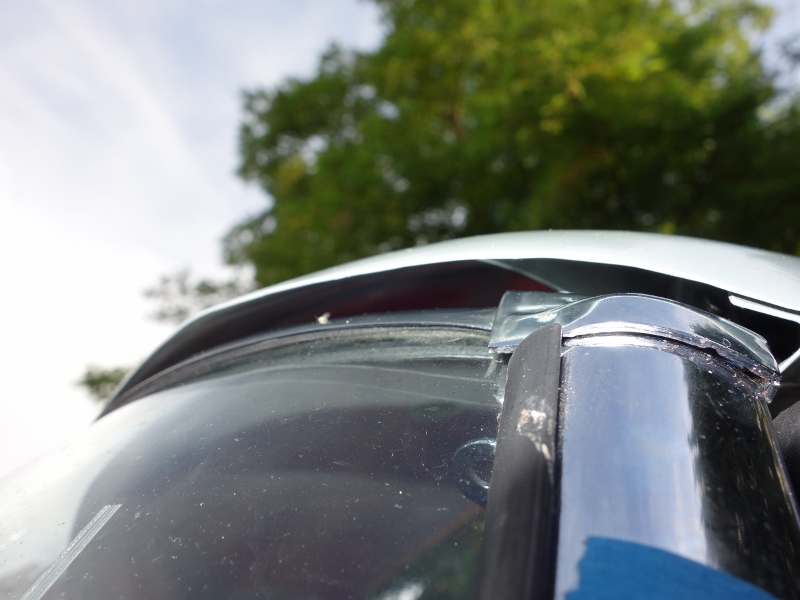
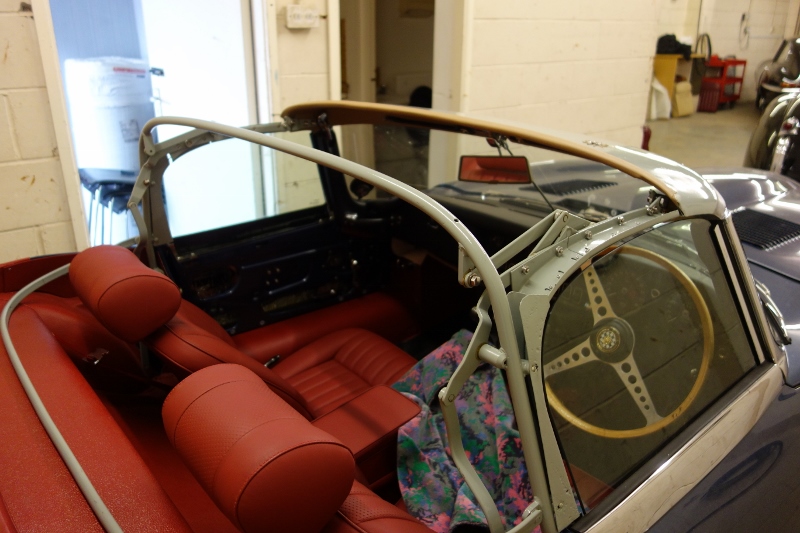
Dropping the car off at Suffolk & Turley for hood fitting Brand new Robey canopy need fixing first, it was that bad Gaps at each ends but front of middle section is too curved

I had given up trying to trial fit the new Martin Robey canopy as it was so far out. Luckily RS Panels are next door to Suffolk & Turley and were given the task of fixing the shape of the canopy.

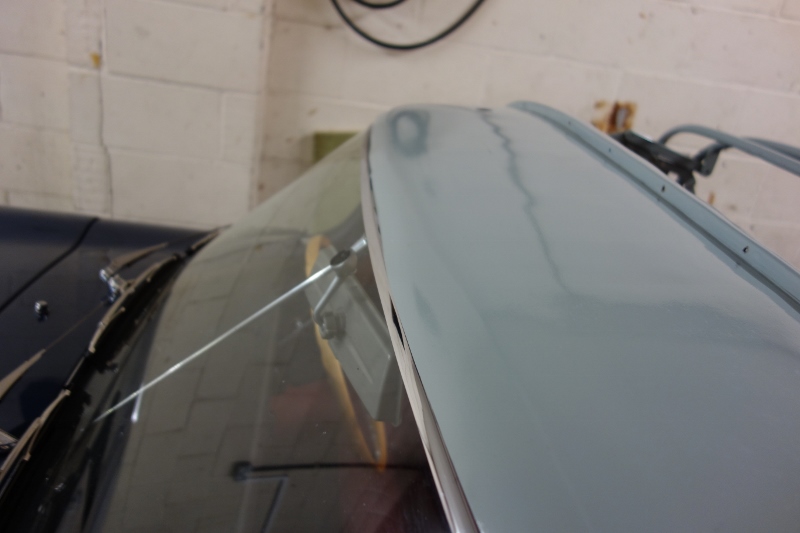
They had to weld an additional 1″ strip to the leading edge of the canopy, re-profile it to the shape of the windscreen’s top chrome and then repaint. There’s no way I would have been able to get this ‘brand new’ canopy to fit without their expertise. Another issue was the canopy didn’t have any mounting holes for attaching the wood bows. Pretty poor really.

Additional metal tack-welded to canopy Wood bow pre-fitted to aid fettling Re-profiling canopy to windscreen chrome

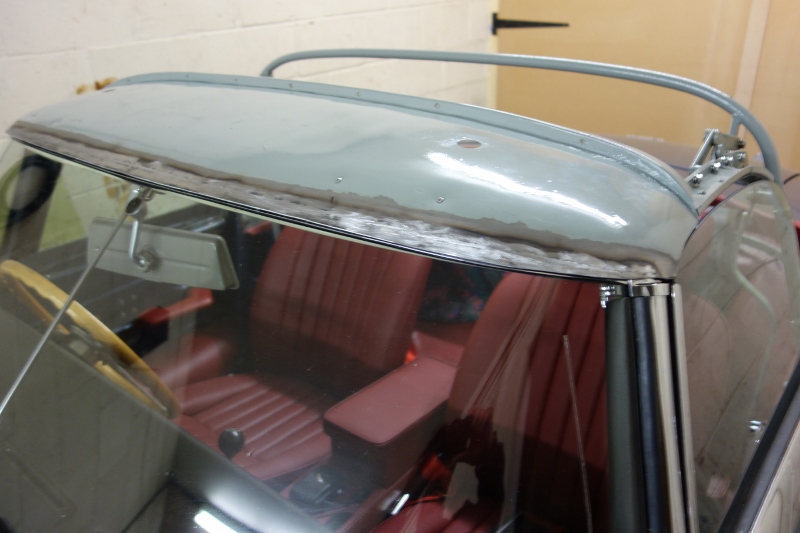
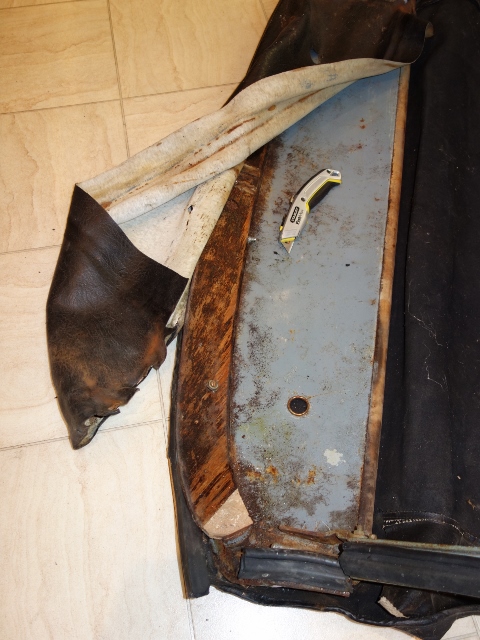
After the re-worked canopy was trial fitted it was taken off to get trimmed in the standard light sand covering. I had provided S&T some tacking strips but these didn’t pass muster due to the poor fit. Replacement tacking strips were attached to the rear hood channel and covered with matching red vinyl.

Final trail fitting of the canopy before trimming Rear wooden tacking strips covered in vinyl

A few pictures of the trimming of the hood canopy. They’ve done a fantastic job:
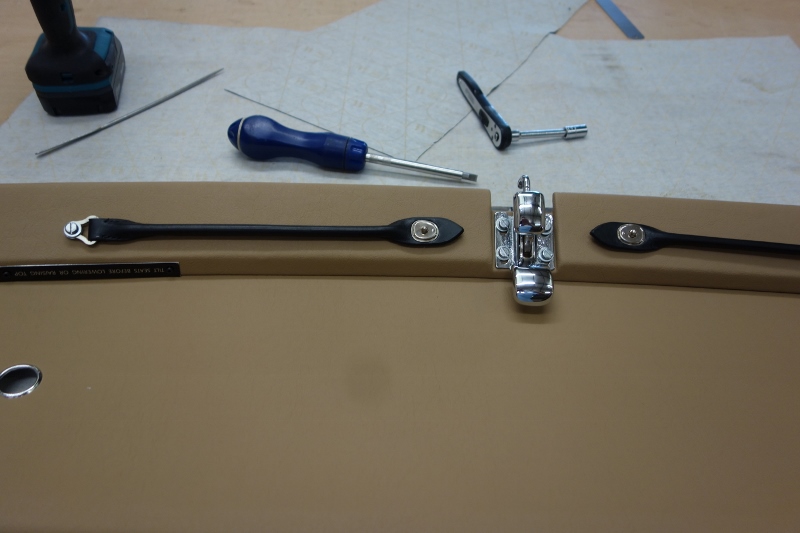
Covering the rear wood bow Awaiting the various fixings Front clamps & tilt warning added
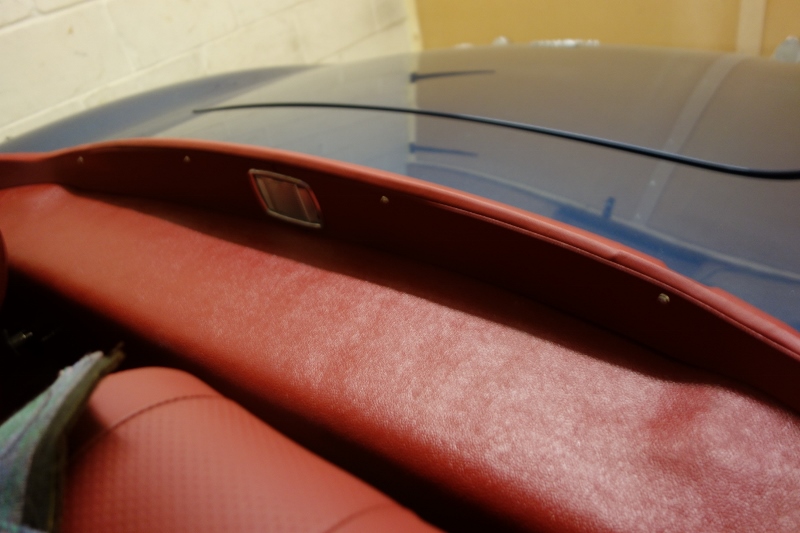
Tie down strips will pass through chrome escutcheons Tie down straps clip to front wood bow when not in use Completed hood canopy ready for fitting

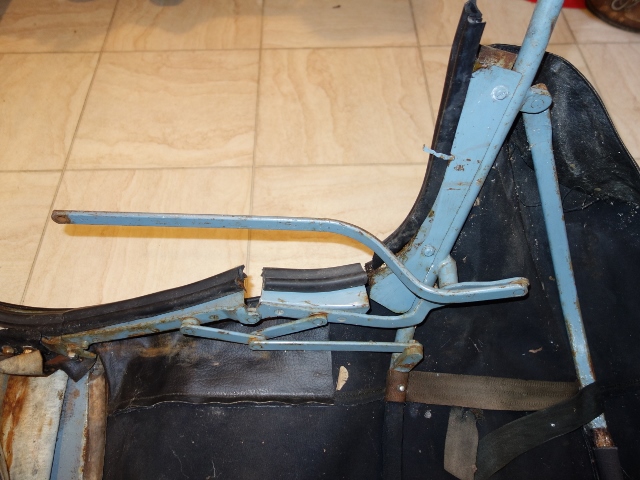
The canopy was then reunited with the hood frame ready for the hood canvas, in dark navy blue. Photos covering the fitting of the canvas:

Canopy refitted to frame Rear is attached to tacking strip
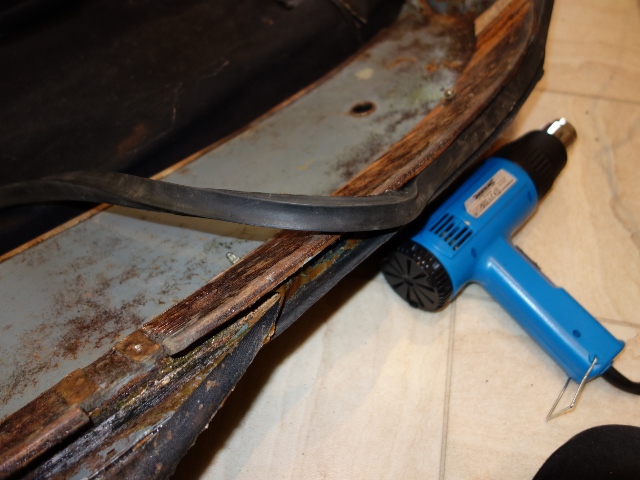
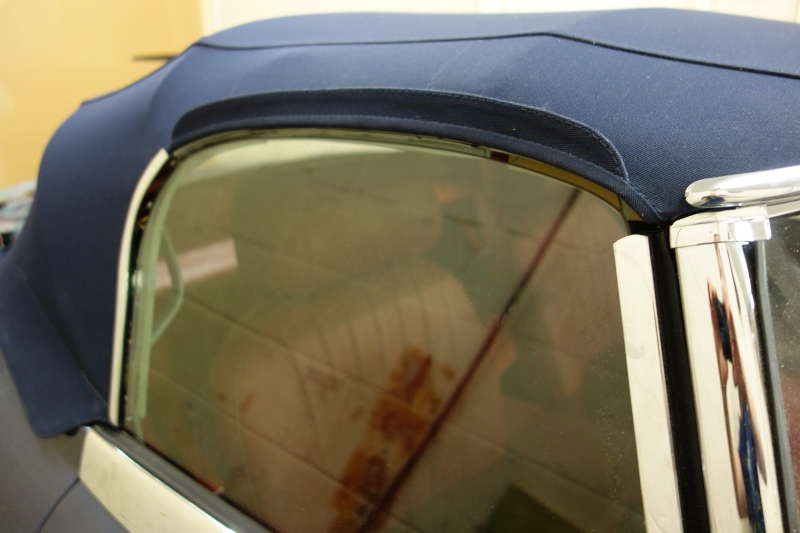
Rear is nailed to tacking strip and covered with chrome trim The front edge is bonded into thee rubber seal channel The drop glass was adjust for alignment and maximum height

The final touches were added to the hood – the front and rear finishing chrome strips:

Finished rear with hood envelope hooks Front finishing chrome

My intention wasn’t to create a ‘trailer queen’ to be cosseted and polished. At the same time I don’t expect to be testing its watertightness too often. I certainly hadn’t expected to test it so soon after collecting the car. The trip back was peppered with downpours, some torrential.


First watertight test!

It was quite possibly the most scary drive I’ve ever had! The woefully inadequate wipers merely smeared rather than actually wipe so I couldn’t see anything. The springs on the wiper arms appear to be too weak to actually compress the rubber against the screen.

I certainly don’t want to repeat that experience and so will be applying some Gtechniq Clearvision. It’s similar to the Rain-X product although (hopefully) harder wearing. It leaves a hydrophobic layer on the glass which causes the water to bead and simply roll off the windscreen. In theory it’s possible to drive in rain without needing to use the wipers.

I’m also going to see if a slight bend can be put into the wiper arms to apply sufficient pressure to compress the rubber.

I would like to report that the hood is completely watertight but it’s not! There was a slight leak on both sides at the top of the A-post. Although this was largely my fault for cutting the A-post rubber slightly too short. I should have left rubbers with a generous excess for Suffolk & Turley to trim back when they fitted the hood.

It’s not a disaster as I should be able to detach just the length running up the side of the windscreen and stretch it to fill the gap to the hood rubber.

May 272016
 

The opportunity to go travelling for six months, neatly avoiding the whole of the UK winter, was too good to miss! The finishing line of the long running restoration was tantalisingly in sight, with only a few minor trimming tasks to complete before taking the car up to Suffolk & Turley to have the hood fitted.

The final few months of last summer was spent desperately trying to arrange for the hood to be fitted but circumstances were against me and time ran out. Still it’s a good excuse for yet more gratuitous holiday snaps to explain the lack of progress:

  • Che Guevara, Plaza de la Revolución Havana

While travelling, I had at least managed to come to an agreement for Suffolk & Turley to schedule the hood to be fitted towards the end of May. I would take the hood frame up as soon as I returned to the UK at the start of May so they could address the canopy issues. The car would follow a two weeks later to have the hood fitted at their workshop, weather permitting!

It will have been a long time coming, the car has been hoodless for almost a year since it was MOT’ed. The two weeks would give me enough time to complete the few other trimming jobs beforehand. Suffolk & Turley had suggested leaving off the door cards and a few of the vinyl-covered metal panels as it’s best to fit them after the trimming of the hood.

I was pondering whether to fit the chrome hardtop mounting brackets as they might get in the way while fitting the hood. These brackets have a Tenax fastener stud for securing the hood envelope. As the envelope was missing when I got the car, I became side-tracked trying to understand how the envelope fitted over a lowered hood.

Tenax stud on hardtop mounting bracket Operating manual show stud positions

It then dawned on me that I’d forgotten to fit the other two Tenax studs which are mounted on the rear bulkhead to attach the hood envelope straps. The studs pass through the bulkhead vinyl and are secured by a nut and washer within the boot space. The realisation soon turned to a sinking feeling – getting out of this pickle was a cyclical conundrum of my own making.

Spot the deliberate mistake
(no – not the missing seat!)
These tiny Tenax studs should have
been fitted through the bulkhead Hardura

I had spent some time trying to make the installation of the inertia reel seat belts as neat as possible … and I must admit I was quite pleased with the outcome. However it had now come back to haunt me. Needing to retro-fit the studs had created quite a dilemma. It was now impossible to locate the holes for the studs in the bulkhead since it and the boot space had now been covered with Hardura.

The only option was to remove the Hardura trim in the boot to reveal the mounting holes. However I had mounted the seat belt inertia reels over the boot trim in my quest for neatness. So the reels would have to be removed before the Hardura. However the removal of each inertia reel is via a single bolt passing through the bulkhead from the cabin. Again the bolt heads had been covered by the bulkhead Hardura to keep everything neat and tidy.

Inertia reels were mounted
over the boot Hardura trim
… and secured by bolts which
were then hidden under Hardura

Therefore I would also have to remove the bulkhead Hardura too … but I needed the bulkhead Hardura in place to mount the studs!!! Hmmmm ….

After some thought, a plan was hatched to lift as little as possible of the bulkhead Hardura. Just enough to provide access to the bolt heads. The difficulty was the studs are located quite close to the inertia reel mounting bolts. In addition, I’d been rather diligent in making sure the bulkhead Hardura had been well and truly stuck down in the first place.

The internet can be a wonderful source of information at times and a suggestion was to use Zippo lighter fuel to weaken the contact adhesive’s bond. This worked a treat and had the benefit of not damaging either the Hardura or paint work and evaporated fairly quickly.

Bulkhead Hardura was carefully lifted Lighter fuel reduces contact adhesive bond Both boot Hardura & Dynaliner were trashed

Although it was a very slow and messy job. One that I hope never to repeat! The lighter fuel slowly dissolved the contact adhesive which enabled various implements and fingers to lift the Hardura without pulling off the jute backing. However it soon evaporated causing said fingers to stick together and to anything else they came in contact with. The reinforced tape used to cover the anti-drumming/strengthening indentations was a great help in lifting the trim and enabled large areas to be lifted quite easily.

Unfortunately the same could not be said for the trim in the boot. Both the Hardura and Dynaliner underlay were destroyed when they were removed. Fortunately I had enough left over of both to re-trim the boot. I decided to repeat my ‘tidy’ installation because the lifting of the trim, whilst messy, hadn’t been as bad as I had feared.

So the order of re-fitting was:

  • Fit the two Tenax studs to the bulkhead!
  • Re-trim the boot Dynaliner and biscuit coloured Hardura
  • Fit the boot side boards and mount the inertia reels
  • Stick down the lifted bulkhead Hardura
  • Refit the seat belt webbing and boot release cable

Once the boot trim had been removed, a needle was pressed through the holes for the studs to indicated their positions from the cabin side. A drill bit rotated by hand was sufficient to create the necessary hole in the layers of trim into order to fit the studs. With the Dynaliner in place, the Hardura was bonded to it with spray contact adhesive. I found it easier to bond the middle third first before tackling each end.

Position of Tenax stud located! Dynaliner fitted and masked for bonding

After the inertia reels were bolted in place, the top of the bulkhead was re-covered with the reinforced tape. This was initially done to stop the indentations showing through over time but has the added benefit of making the trim removal easier in future. Heaven forbid!

Plenty of reinforced tape was laid down before bonding the lifted section of Hardura

The seat belt webbing was then fed through the bulkhead and connected to the inertia reel. It’s not a job I enjoyed as it’s fiddly, hard to get at and there’s a potential to ruin the reels. The spring in the reel has to be at it’s most coiled state when the end of the webbing is fed through the centre of the reel. There’s a real risk of accidentally letting go of the centre which needs to be held against the spring pressure. If it’s allowed to uncoil freely then the spring becomes unseated and breaks the internal mechanism which is sealed.

Laying out webbing to avoid kinks Apart from a final clean, all sorted

After rectifying the stud problem it was rather disappointing to find out that they still can’t take the car to fit the hood. It has now been delayed until the start of June. At times I wonder if it will ever have a hood!

May 162016
 

The trimmers, Suffolk & Turley, suggested that it would be useful to trial fit the hood frame before bringing the car up to fit the soft top. The only two adjustments I could find were moving the mounting brackets fore and aft and adding shims underneath the bracket to raise the frame away from the body. So it shouldn’t be too difficult …. I really should know better by now!

Parts problems
S & T had inspected the hood canopy and condemned it to the scrapheap but, by chance, Martin Robey had just one remaining in stock. It was purchased on the spot to avoid any further delays, despite the eye-watering cost. When it failed to turn up several days later Robeys received a chase up call. It was only then that they admitted they didn’t actually have any in stock. It would be several weeks before a new batch were manufactured. The new canopy eventually finally turned up some two months later. It was very frustrating, although worse was to come …!

The ‘complete’ hood frame bolt set (SBS9069) from SNG Barratt wasn’t much better! The one thing you could say about it, it was anything but complete! Some smaller washers didn’t fit any of the bolts in the kit and all the brass washers (2x BD541/22 & 2x BD541/23) were missing for the pivot joint between the links and the front canopy.

Their bolt set appears to be just for the parts to attach the folding links to the hood frame sticks. The four ‘special’ bolts and brass washers securing the frame to the chassis need to be purchase separately; the bolts pivoting the main sticks (BD19160) and the bolts fixing the control link to the chassis body (BD19393).

The SNG website suggests 8 brass washers (BD541/30) are required for these four special bolts. However the bolts have different diameters, so I found it required only four of these larger washers for the pivot joint for the main sticks. The control link bolts require four of the smaller washers, BD541/23.

To be fair to SNG Barratt, the parts of their website had been taken from a parts lists produced by a third party which I suspect is incorrect. SNG even supplied the missing/incorrect pieces free of charge which was a nice gesture. However the toing and froing added yet more unwelcome delays.

Trial fitting the hood frame
The first task was to loosen the various pivot points in the frame links which had been locked in position by the powder coating and re-tap all the screw threads. A sharp blade was sufficient to break the paint seal on the joints to allow a light oil to be worked in, until they were well lubricated and operating smoothly.

The hood sticks pivot on the special bolts which pass through the chassis mounting brackets. It was a tight squeeze inserting the brass washers that sit either side of the pivot points to aide rotation. A screwdriver was needed to prise open the brackets to insert the second washer. Fortunately the bolt has a tapered shoulder which helps pull the final washer into alignment.

Shouldered pivot bolt screws
Note: lubrication hole for pivot joint
Two brass washers are fitted per side.
Brackets are handed & bolt heads face inwards
So far so good – the hood sticks fitted! Shims may be needed under B-post brackets

The two folding mechanisms (or links) are attached to the hood sticks by two bolts each side. A further bolt secures their control link arm to the chassis, on inside of the B-post. Again brass washers are fitted to each joint. One thing I’ve noticed on most cars is the control link arms rub against the vinyl covered B-post trim, causing unsightly wear damage. When I have more time, I plan to investigate whether a spacer can be fitted, to lift the control link away from the trim.

The cantrails are simply bolted to the folding mechanisms and don’t have any adjustability.

Folding mechanism in place Cantrails and canopy link added

A watertight seal between the hood and drop glass (don’t laugh!) is created by sections of rubber moulding attached around the cantrails and the vertical main pillar posts. A lip to receive the rubber is created by small angled brackets which are just riveted to the cantrails (the lip is integral to the main pillar pieces).

There was some evidence that these brackets had been repositioned as there were several sets of drilled holes. I had assumed this was to fine tune their alignment with the drop glass. However, rather oddly, only one set of holes matched those in the cantrail. So I’m a bit mystified what had gone on in the past. I do know, from the bodging of the canopy, the hood has been apart at some stage.

Riveting brackets to cantrail rubbers

The range of travel of the canopy is limit by a stop stud attached to the link mechanisms. From the closed hood position, the front of the canopy can be raised slightly, until the stop studs are reached. At which point, pushing the canopy further up causes the link mechanisms to start folding.


New & old hood stop studs

Unfortunately both studs were rusted firmly in place and so the only option was to carefully cut each nut off with a Dremel. The remains of the studs were then used as a pattern in fabricating replacements in stainless steel.

The studs have clearly been designed to allow for a small degree of adjustability because the threaded section is not concentric with the main body of the stud. Rotational adjustment is made via the screwdriver slot. I’ve not been able to work out why this is needed.

Finally the hood canopy was fitted. As the strengthening wood bow still needs to be fettled to fit the canopy, it was only possible to fit the outer two hood retaining clamps at this stage. The fit of the brand new Robey canopy was truly shocking. It wasn’t even close.

The curvature of the front of the canopy is all wrong. The front centre section bends downwards too much so it is in hard contact with the windscreen chrome when the clamps are engaged. Also the outside corners protrude too far and there’s a substantial gap to the same chrome trim. I’ve had trouble with some replacement parts but this is about as worse as it gets.

The new Robey canopy fitted Fit along windscreen is atrocious
Daylight through the gap Each side also protrudes too far

The fit is so poor I had to abandon thoughts of completing the trial fitting and called Suffolk & Turley to discuss my options. It will take extensive sheet metal work to rectify. Fortunately RS Panels are next door to S&T. They will be asked to undertake the panel work to obtain a good fit before the trimming of the hood canvas.

It was not the first time they had come across this problem with Robey canopies. Something that really shouldn’t be necessary on a new panel, especially when charged such an extortionate price. I suspect they just churn them out thinking if they look about right they’ll have got away with it. By the time the customer finds out, it will probably be too late. There’s no excuse for it.

The impact was that it hadn’t been possible to have the hood fitted before heading off travelling for six months. I had hoped to arrange for the hood work to be done while I was abroad, so I could return to a completed car. However the logistics and available slots in people’s calendars meant it wasn’t to be.

Nov 062015
 

An opportunity to take a career break to go travelling for the duration of our winter was too good to turn down. So the fitting of the hood had started to become quite urgent!

My intention was to put it into the care of one of the car storage companies that specialise in classic cars. Most store the cars in cocoons in a temperature controlled environment and offer additional services such as tyres shoes (something I didn’t know existed!) and to run the car periodically. Obviously all at a cost.

Numerous phone calls had been made to Suffolk & Turley in a desperate attempt to get the hood fitted before I departed. I didn’t want to pick up next year in the same position waiting for a slot to trim the hood.

With only weeks to go it became fairly obvious that it wasn’t to be. To be fair to them, the issue is that the hood required a new metal canopy as the original one had been butchered and was rusted beyond repair. The fit of the new canopy supplied by Martin Robey was so shocking, it would require extensive panel work (shaping and cutting) in order to get it to fit. Only then could they start to fit the hood.

The specialist metal work is not something they are able to provide although they farm out such work to RS Panels, who luckily are just next door. RS Panels main line of work is producing high-end, bespoke bodyshells and body panels. Unfortunately a healthy order book has ruled out being able to take on any small one off jobs like mine in the near future. So I will have to wait, most likely until the new year.

It was therefore going to become a logistics exercise while overseas, arranging transportation to and from Nuneaton, once dates were confirmed.

Numerous offers had been received to ‘look after’ the car whilst I was away. I think (hope!) mostly in jest. The lack of the hood and having to arrange transportation could become a real problem, especially if put into commercial storage. It would also be preferable to be driven rather than just turned over every couple of weeks or so …. and be relieved of the best part of £1,000 for the privilege!

It didn’t feel right to be paying for it to be bubble wrapped rather than being enjoyed. I mentioned my dilemma to John, who’d helped with putting in the IRS and resolving numerous other issues during the restoration. If he could clear out enough space in his garage and I was sure of entrusting it in his care, he might be able to re-home the cat!

A tentative plan was coming together and it was fitting John would have the first opportunity to drive it after all the help I’d received, admittedly being limited to dry days due to the lack of hood. The other advantage would be another pair of eyes to critique the restoration and suggest any improvements. Something I soon came to regret ….

A trip to its potential new home was organised, so the garage could be measured up for size and the garage clearing task assessed. Although really it was just a good excuse to take it for a spin. The deal was done …. but not before John had pointed out my shockingly poor tail pipe alignment!!

It might also be possible with his contacts to have the ignition mapping done while I was away. After the garage re-homing reccee, it was taken back to the local independent Jaguar specialist who finally got the engine running smoothly by correcting all the valve clearance shims. They had suggested putting 1,000 to 1,500 miles on the clock before doing so, which was sensible advice so I’ll leave that until next year.

I had a long list of small tasks to complete before I went travelling. The mudguards and torsion bar guards had been trial fitted but still needed refitting, one of the radius arm bolts needed nipping up as it was causing a slight knocking on acceleration and to gather all the bits and pieces for the hood.

While struggling under the car, cursing the near on impossible contortions needed to get spanners onto the bolts for the torsion bar guards/mudguards, I happened to glance up at the passenger footwell. To my horror, the whole of the front end of the sunken section had been push in by several inches. Distraught didn’t come close.

It was so near completion and, at that moment in time, in my (somewhat moist) eyes, the whole restoration ruined. I started retracing where it had been driven but it hadn’t been out of my sight and it would have been some impact to cause that much damage.

It was some time before I could even face getting back underneath to assess the damage. But when I did, something was odd. There wasn’t any hint of paint damage and the paint layer was still intact. It must have been caused by compression from below rather than an impact while driving …. and then it dawned on me. I’d visited the garage when it was in having the engine issues resolved and it had been hoisted up a couple of feet using a two post lift.

Damage to the passenger footwell Similar damage on driver’s side The only possible cause …..

They’d used the floor pans, rather than the jacking points, to raise the car. By chance I’d taken a photo for the blog while it was on the lift, which confirmed this could be the only possible cause. The pads on the lift arm must have has some dum-dum like substance on them as they had left a round shaped deposit on the now buckled floor pan.

I was mulling (read raging) over how I would tackle the garage the following morning when I noticed the driver’s footwell was similarly damaged. I was far from a happy frame of mind and it was heartbreaking after all the care and effort put in. With only a couple of days before I flew off on my travels, it had the potential to ruin that as well. Although it categorically pointed to lift damage.

I abhor confrontation but in this case I was up for giving them a piece of my mind and some! It was just as well I was able to sleep on it, anger wouldn’t solve anything, so I went to the garage with the approach that accidents happen (no matter how amateurish) but I wanted it resolved.

To give them some credit they initially put their hands up, accepted liability and agreed to do whatever was necessary to rectify the damage. So I felt reassured it could be resolved while travelling. Discussions are on-going so I won’t add anything further at this stage.

Speaking to people from the E-Type forum and Hutsons, this type of damage is apparently becoming an all too common occurrence as mechanics who are used to working on older cars are becoming harder to find. They also suggested that, even though it looks awful now, a good panel beater can reverse the damage so you’d have difficulty telling. We’ll see.

The intention has never been to have a ‘trailer queen’. I’d rather have a car that I’ve restored to the best of my abilities and then have the enjoyment of driving the car, accepting it will pick up the odd scar here and there. I just hadn’t expected major surgery so soon.

The final task was to deliver it to its ‘snug’ new home and hand over the keys so it can hopefully have a good few runs out while I’m away. Although track days are strictly off limits!!

Shocking tail pipe alignment.
Ooops – how did I miss that!
A snug fit in its new home … Hopefully it can get a few
trips out while I’m away

As the UK disappeared from view, I’ll sign off until next spring …. unless there’s progress on the hood front. Fingers crossed!

 Posted by at 10:00 pm
Mar 252015
 

New hood pivot bolts

The removal of the hood many years ago had been problematic to say the least. The threaded section of the pivot bolts is a much smaller diameter than the unthreaded section, which the hood sticks pivot around. The bolts wouldn’t come free even after applying penetrating fluid and adding an extension piece onto the ratchet handle. The force being applied was more likely to shear the threaded section, so I stopped to have a re-think.

However the problem wasn’t that the threaded sections had seized within the bracket’s captive nuts as I had thought. Small holes are provided in hood sticks for oiling the pivot joints. Unfortunately it’s doubtful they had ever been troubled during routing maintenance!

The result – the whole pivot joint had rusted, fusing the bolt to the hole in the frame. The hood no longer pivoted on the bolts. The bolts and frame just rotated in unison in the mounting brackets, as the hood was raised and lowered. The only way I could then remove the hood was complete with mounting brackets.

I couldn’t believe how solidly they had rusted in place. In a foolish fit of pique, I ground away the heads of the bolts, which were looking decidedly rounded by this time. Cutting through the threaded sections to finally free the hood from the brackets. The whole hood was left, as is, until now so I still had to overcome the issue of removing the remains of the bolts.

The remaining sections of the bolts wouldn’t budge even after soaking in Plus Gas penetrating fluid for several weeks, applying heat, attempting to press them out in a vice and, in a Cleese-esque manner, giving them a good thrashing with a club hammer!

The hood needed a full overhaul Every hood fixture was heavily rusted First, removal of the old canvas

The plan is to have the hood professionally fitted by Suffolk & Turley. Even though they will happily undertake all the work, including the renovation of the frame, I wanted to do as much as possible myself. So I set about removing the canvas and dismantling the frame into its components on order to have them powder coated.

First, the canvas was detached from the rear of the frame – by removing the side chrome trims, which clamp the canvas rearward of the drop glass and unpicking the webbing attaching it to the frame sticks. Removing the hollow, square-sectioned rubber seal, which makes the seal against the top of the windscreen, reveals the canvas and vinyl edges in the channel underneath. The canvas and vinyl could then be pealed off the canopy, while applying heat to soften the adhesive.

Main head/cantrail brackets attached to frame Bonded edge of canvas/vinyl under screen seal Vinyl removed revealing wood canopy bows

The detaching the cantrail and main head brackets also proved troublesome. The removal of the pivot bolt remains was soon joined by the need to remove half a dozen screw stubs. Some of the screws fixing the main head/cantrail brackets and hood clamps had sheared or had to be drilled out. Their slotted heads had become too damaged by attempts to unscrew them.

Latch covering trim under two canopy mounting bolts Softening old adhesive with white spirit

The pivot bolts were removed by drilling a pilot hole down the centre of the bolt. It was more important to keep the pilot hole square on to the bolt than ensure it was precisely centred on the bolt. Progressively larger drill bits were used to enlarge the hole until a line of rust could just be seen running down the length of the hole. A pointed drift was then used to collapse the perimeter of the bolt inwards allowing the bolt remains to be pushed out.

The same approach was followed for the screw remains in the hood sticks. Although this time it was essential that the drill bit was centred on the bolt so the thread wasn’t damaged. They were then re-tapped to reinstate the thread.

Initially the canopy didn’t look too bad but it had clearly been worked on before as the whole frame had been hand-painted a light blue rather than the original light grey. The forward wood bow had a small section missing and it had started to delaminate. The edge of leading edge had rusted away along the entire length of the canopy although it should just be a matter of welding in some new metal.

The leading edge has rusted away The wood bow was also delaminating Re-tapping the frame after drilling out screw stubs

A second opinion was needed so it was taken up to Suffolk & Turley in Nuneaton. Their evaluation was not good, enquiring whether I’d found in it a canal! In addition to the problems I’d spotted, they pointed out that the lip where the two outer skins meet had been cut away at one end. It should be proud of the wooden bow by approx. 2cm as it forms the upper part of the channel for the rubber seal. Also, the front 6 inches across the full width of the canopy was largely filler.

Their preference is to re-use original parts rather than replace. The replacement wood bows are available but the quality is not great and it takes some work to get them to fit. Even so, their verdict was it wouldn’t be cost effective to repair the metal canopy and the front wood bow was unlikely to survive its removal. Only the rear wood bow was worth saving, as these are no longer available.

It was a long way to travel to learn that the canopy was junk and I was now resigned to inevitable fleecing that was coming my way! Both for a new metal canopy and a wood bow, which I believe is north of £300 from SNG Barratt!

As luck would have it Martin Robey had one S2 canopy left in stock so it was secured on the spot. A week or so later it hadn’t turned up so I gave them a call. It was ‘virtually’ in stock … they just had to make it first! Two months later it finally arrived.

In the meantime I’d found a Czechoslovakian subsidiary of the German company Slavik, which made all the wooden components for earlier Jaguars, and at a very reasonable cost of £75 for the wood bow. They were making a trip to the UK a few weeks later and suggested sorting out the payment and shipping once over here. Needless to say, I didn’t hear from them so I presume they forgot to bring it and I got no response from follow up emails.

Trial fitting the rear bow to the new canopy Replacement canopy wood bow

Finally a piece of luck, a wood bow appeared on eBay. I’d lost so much time waiting for parts, I contacted the seller and agreed a private sale, rather than wait until the end of the auction. A trial fit of the bow with the new Robey canopy confirmed it will need a fair amount of fettling to get it to fit.

Now I had all the components, it was off to Nationwide Coatings”to have them powder coated in BS381C-694 ‘Dove Grey’. The advice from the E-Type forum was that this was the correct/nearest colour match. Typical …. the powder coating manufacturers no longer supply powder covering the old BS381C range!


Original paint allowed a colour match

Traditional paints do not adhere to powder coating. However new paints have been produced specifically for this purpose. So they recommended powder coating the hood components to the nearest light grey colour available and then over-coating with a colour-matched paint. A couple of parts had hidden surfaces that missed being hand painted in blue so they will be used to get an exact match to the original colour. The powder coating should provide the durability while maintaining the correct colour.

My aim had been to get the car ready for a trip to the Monaco Grand Prix at the end of May. This is now looking to be a very long shot, having lost two months waiting to just trial fit the hood. Also, in a nod to practicality, I’d decided to fit inertia seat belts rather than static seat belts. These have been on order since the New Year and there’s still no confirmed delivery date. The fitting 3-point Seat belts became mandatory from 1968, so I won’t be able to get an MOT until they do.