Oct 162015
 

Default 4.2 ignition mapping

The EDIS Megajolt electronic ignition kit for the 4.2 engine was supplied with an ignition mapping that closely replicated the advance curves of the original Lucas 22D6 distributor.

The aim is to produce a mapping tailored to my actual engine by taking it to a professional outfit with a rolling road. Although I’ve been told it’s not for the faint-hearted. The engine is taken through its paces with sustained running all the way up to the red line!!

For now, I’ve followed a suggestion from the E-Type forum to load different mappings into the Megajolt controller to compare. A number of owners have produced maps for their engines and uploaded them to the forum for others to try. As the controller can store two different maps at any time, a discreet switch has been mounted in the glovebox to enable switching between two maps.


Checked into the Jaguar specialist
for further investigation

Although the final tuning and mapping is some way off as neither the garage that did the MOT nor Powerbell, a local independent Jaguar specialist, had been able to tune the carburettors to get the engine running smoothly. The latter suspected there might be either sticking valves or valve clearance issues which would require further investigation.

The engine had sat without being run for quite a long time since being reconditioned by VSE, which is far from ideal. The plan was to run the car for a while to see if the layup had resulted in a slightly sticking valve which might clear with use …. ever the optimist! Alas it didn’t! So the car was returned to Powerbell to get to the bottom of the rough running.

The first task was to perform a compression test and measure the valve clearances. The manual indicates that the expected compression pressures are 150psi for 8 to 1 compression ratio and 180psi for 9 to 1. The test showed mine were way off and in some cases almost non-existent:

Cylinder: 1 2 3 4 5 6
Pressure: 125 130 125 120 65! 10!!

The thicknesses of the valve adjusting pads under the tappets were miles out so everything was far too tight. The guys at Powerbell were shocked that they could be so far out in a newly reconditioned engine. Had I not decided to get it resolved now, they said the likelihood would have been burnt valves and a much bigger problem to resolve.

The compression test revealed very
low pressure in cylinders 5 & 6
Calculating the correct thickness
for the valve adjusting pads

I was relieved but at the same time not impressed with VSE who had rebuilt it. Unfortunately it’s way past the standard one year warranty they offer but I’ll not be using them again. It really shouldn’t be necessary to correct a simple measuring job that could have had expensive repercussions.

Removal of the camshafts to correct the valve clearances … on a newly reconditioned engine!

It was with some anticipation that I headed off to pick up the car when the call came to say it was ready. I really didn’t know what to expect but it had been transformed! It was now able to idle at the intended 700rpm, the rockiness had gone and it was running so smoothly.

They did recommend putting on another 1000-1500 miles on the clock, so the engine is properly run in, before mapping the ignition on rolling road.

 Posted by at 8:45 pm
Jun 162015
 

It feels as though the list of outstanding tasks is getting longer rather than shorter. So they have been prioritised into those required for the MOT and those that can wait. Due to the age of the car the MOT is essentially limited to checking the suspension, fuel/brake lines and lights. However, knowing the person doing the MOT, I’d asked them if they would cast a more critical eye over the whole car.

I’d been having trouble balancing the carbs and, although it’s not part of the MOT, I thought it best to have a second pair of eyes look over them. The front two cylinders are running too lean, even though all three carbs have been set to the standard reference point for tuning. So it will be tuned and the headlights aligned beforehand.

I also have concerns about the fuel flow. Last year the petrol tank had be put in-situ to just to start the engine for the first time. The tank was then removed to be painted and since then I noticed that the fuel flow seems to be rather low. Although I suspect I just hadn’t noticed the problem before.

Testing fuel flow from pump Comparing the fuel flows per minute:
250ml at front bulkhead in bottle,
2litres at rear bulkhead in jug

The measurements of the amount of fuel pumped in one minute was taken at the rear bulkhead union and then at the other end of the pipe at the union on the front bulkhead. Although it’s not really a valid test, as there wouldn’t be any back pressure at the rear union, it did provide a feel for the drop off in flow – 2 litres per minute measured at the rear bulkhead union and only 250ml per minute at the front bulkhead union.

Suspicion is that it may be due to an air-lock created in the pipes. However advice from the forum suggested that a pump in good working order would have more than enough ummph to purge any air locks. Some further checks will be done to get to the bottom of the problem.


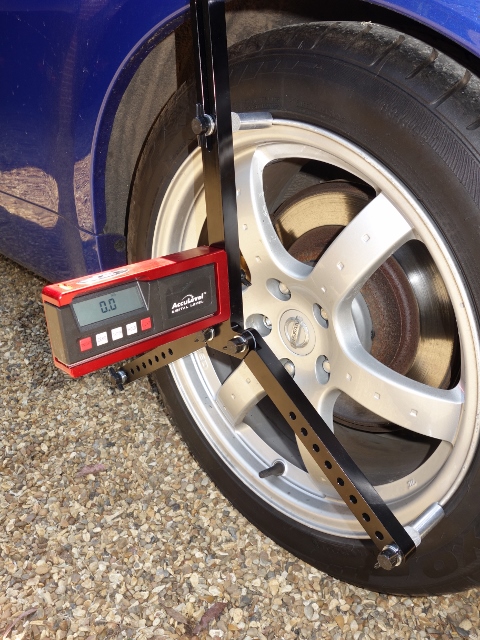
Longacre Camber/Castor Tool

The intention was to set up the suspension geometry myself and so I’d purchased a Longacre electronic camber/castor tool and a Trackace tool for the wheel alignment. The camber/castor tool has three legs which rest against the wheel rim with an accurate inclinometer attached in the centre. However I wasn’t thinking things through and had completely overlooked needing clearance for the central spinners.

The prongs on the legs don’t have the reach so I’ll have to have some made up. Unfortunately the MOT centre no longer has accurate electronic measuring tools for suspension set up. This will have to wait until after the MOT.

For some reason one of the dash indicator tell-tale lights had stopped working and the fault traced to the switches in the indicator stalk. It was easier to take the whole steering column off and investigate further on the bench. A loose back-plate on the switch mechanism had allowed the indicator contact to move about and be bent out of shape. So it was easily rectified.

The clamping bolts on the upper and lower steering column’s UJs had been taken off to aid the removal of the upper column. However, I’d become side-tracked and had not refitted them before attempting to tick off another pre-MOT task … making sure the speedo drive was working.

Needless to say, as I was turning round, after completing a successful straight 40 yard speedo run up the drive, the lower column dropped out of its splines. All steering was lost, blocking a now busy communal drive!
Apart from being stupid, it was a rather timely reminder! The complete suspension parts list was used as a check sheet to ensure every suspension nut and bolt was revisited to make sure everything was correctly torqued.

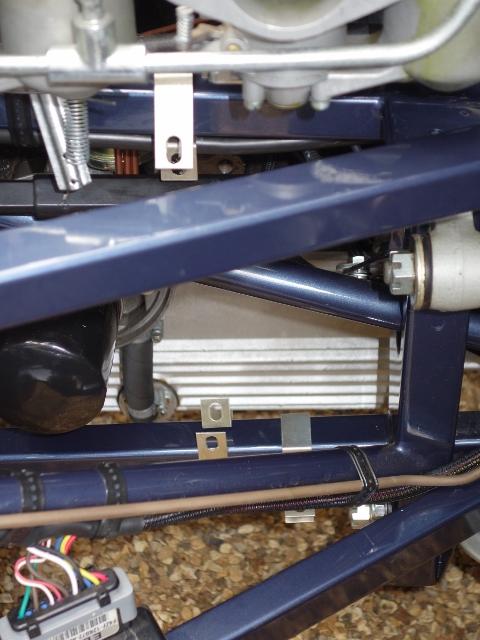
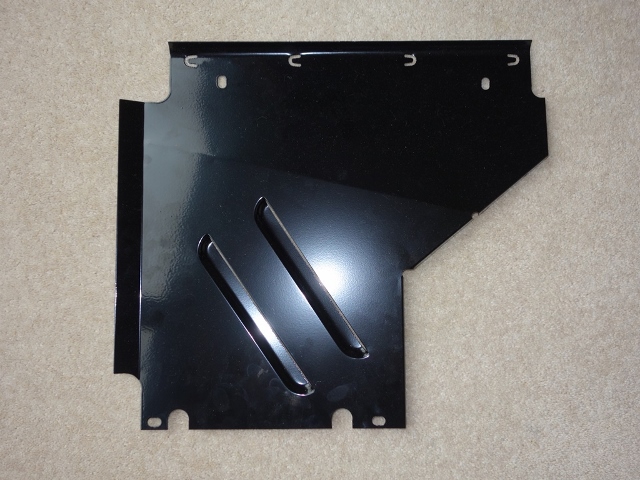
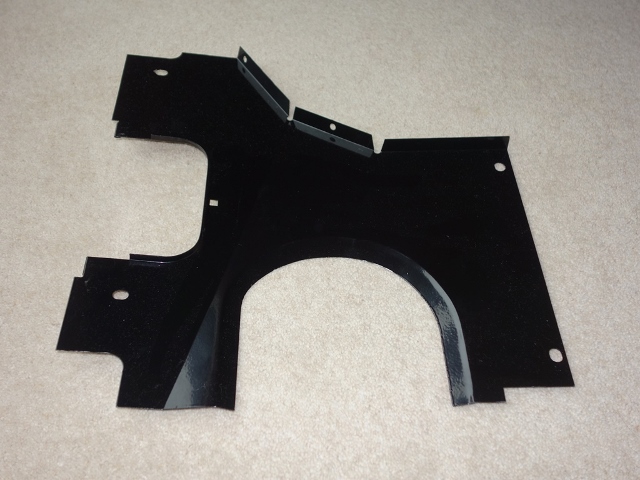
Mudguards, shields and undertrays
The various mudguards, shields and undertrays aren’t strictly necessary for the MOT. However they were fitted, as the horn relay needs to be mounted on the LH mudguard. John Farrell had produced a good guide to the locations and orientations of the five different types of brackets:

Front frame bracket locations Five different bracket sizes

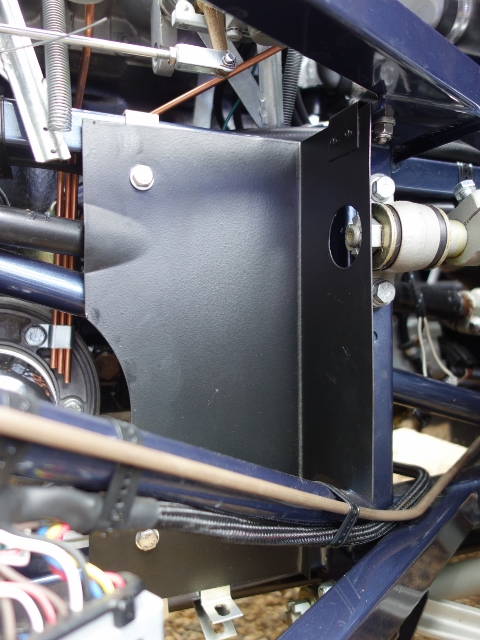
The first to be installed was the air in-take shield which is attached to bracket A at the top and B at the bottom. The leading face is also bolted directly to the frame. It’s worth noting that bracket E for the floor undertray needs to be put in place around the frame before the shield is attached. In fact it’s worth putting all the brackets in place before attaching any of the mudguards, shields and undertrays.

A & B brackets for air intake shield Bracket E for undertray is fitted
before in-take shield!

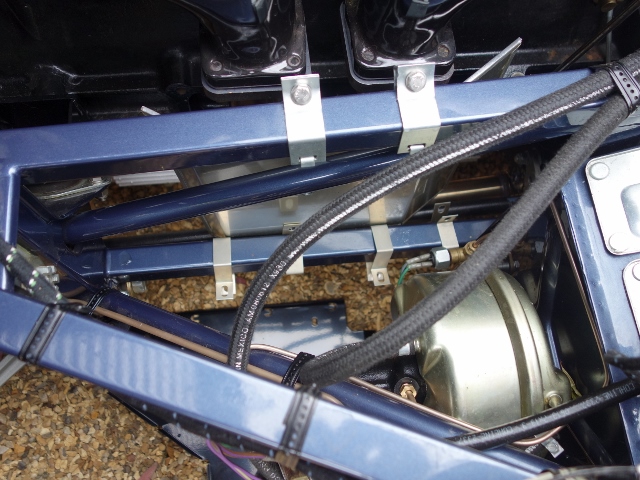
The bracket attachments to the frames are identical on both sides of the car, with the obvious exception of the air in-take shield. The torsion bar shields are attached by three brackets – the rear two have the tab with the bolt holes pointing upwards while the front one points downward. Note: the middle bracket on the LH frame is also used to secure the bottom of the exhaust heat shield.

Alternate rear torsion bar shield
& undertray brackets
Shield bracket also attaches bottom
edge of exhaust heat shield
Front torsion bar bracket (L)
and mudguard bracket (R)

The two floor undertrays are simply bolted in place. Although the right hand undertray has a cut out with a separate cover to provide access to the oil filter.

Left hand undertray Right hand undertray,
without oil filter access panel

There wasn’t any point in completing the fitting the mudguards because they will have to be removed to provide access to set the camber and castor. So at this stage they were only bolted to the sill end panel and attached at the front to a side frame bracket. At least this allowed the horn relay to secured for the MOT. Normally the alternator and aircon (when fitted) relays would also be attached to the LH mudguard, but by modifying the alternator it no longer requires a relay.

LH mudguard temporarily in place just for the MOT Location of horn relay. Alternator relay isn’t needed
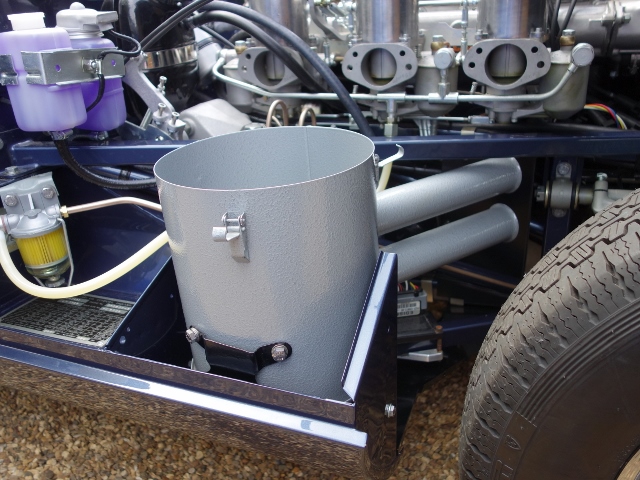
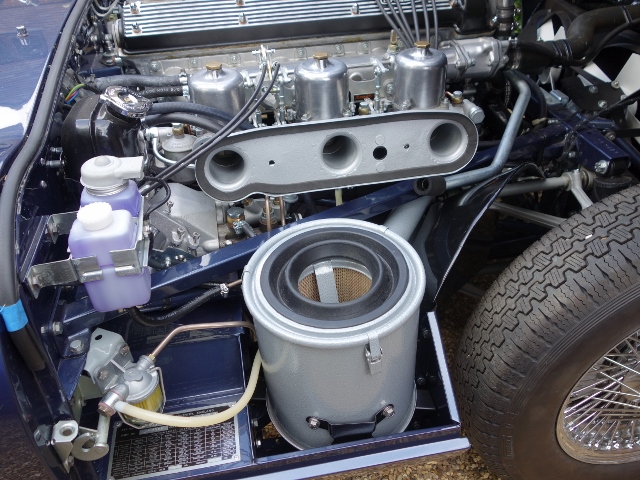
Air Filter
I was regretting not trial fitting the air filter earlier. The new fuel pipe I’d made protruded too far from the face of the toe box, hitting the air filter. Fortunately it was possible to remove a short length from the filter end which resolved the fitting problem but re-introduced all the air bubbles causing the air locks.

It took a while to work out the best method of fitting the air filter element, canister lid and air plenum. Once the canister lid and rubber grommet are in place, there wasn’t sufficient access to pull the grommet up around the lip of the plenum chamber. Eventually I found the best solution was to connect these components off the car and then fit and remove as a single unit.

Filter canister was hitting the fuel pipe Adjusted fuel pipe now narrowly misses it Fitting canister lid first didn’t work

Alternator testing
Another task was to ensure the alternator was charging properly when the engine was running at higher revs. The outcome wasn’t as I’d hoped – it wasn’t charging at all, measuring only 12.5 volts! The converted alternator is now self-energising – the AL terminal, normally used for monitoring the alternator output via the ignition warning light, now provides a DC supply to power the field coil. Finding earth via the field coil through the 4TR voltage regulator.


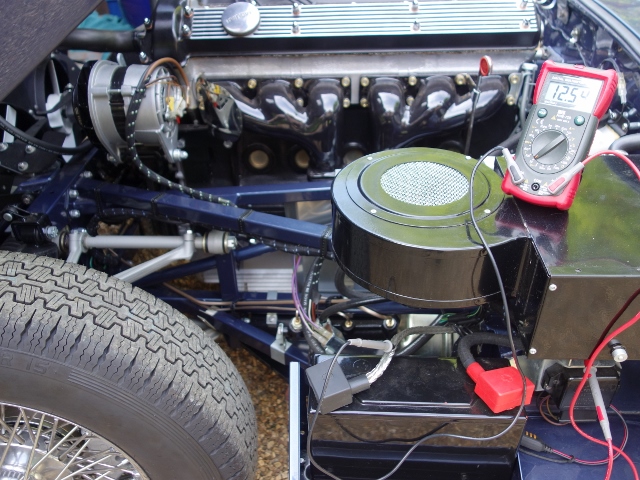
Testing the alternator

The AL terminal was reading zero voltages at idle rather than the expected 14.3 volts! The voltage regulator controls the alternators output to avoid ‘run-away’ where its output would continue increasing until it burnt out the various internal components and/or windings. Increasing the voltage across the field coil increases the alternator output voltage, which in turn increases the field coil voltage.

The 4TR regulator acts as a fast-acting on/off switch. When the output of the alternator increases above a determined voltage (around 14.6v), the regulator switches off the current flowing in the field coil and therefore the alternator voltage drops. Once it has dropped sufficiently, it switches the current in the field coil back on and the alternator output starts to increase, until the cycle repeats.


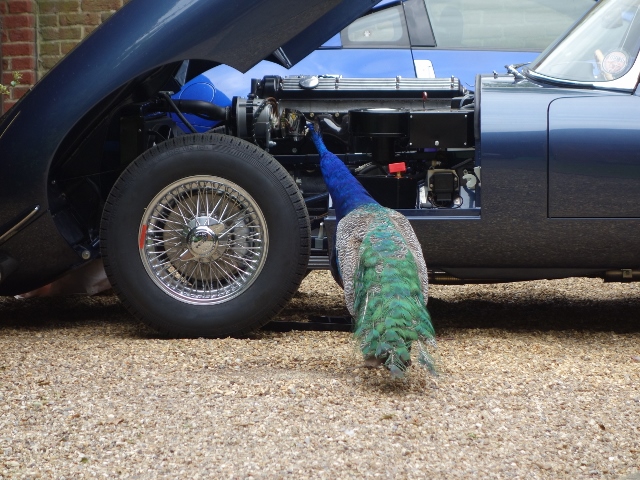
A passing peacock offered
no helpful advice!!

Suspicion fell naturally on my modifications to the alternator and also the 4TR regulator, which are known to be fragile. A faulty voltage regulator can easily be identified by removing it and using a jumper lead to connect the F and ‘-‘ leads in its connector.

If it is faulty, starting the engine will cause it to start charging (indicated by the alternator output voltage or the battery gauge rising above the battery’s normal 12.3-4 volts) If so, the engine should be switched off immediately and the 4TR unit replaced. It was a great relief to find it was the 4TR unit that was at fault and not my handiwork! A replacement was ordered which confirmed the diagnosis and it is now working as expected.

Crossing fingers
I didn’t want to drill holes in the bodywork for side mirrors and so some clamp on mirrors have been attached to the window frames. That just about completed all the pre-MOT jobs.

Clamp on side mirrors fitted After all this time, it’s finally ready for the MOT!!

For the first time in several decades, 1R1421 hit the road …… on it’s way to the MOT centre! …. fingers firmly crossed!!

Jun 182014
 

My approach to the restoration has been to keep things as standard and drive the car for a while, before making any modifications. The two main areas that I have deviated from this are; fitting an EDIS Megajolt electronic ignition system and using the Mangoletsi cable throttle linkage.

The standard throttle has an inherent amount of free play due to the numerous joints in the linkage. The decision to fit the Mangoletsi throttle was aimed at improving the throttle response by removing this play and was based on the views of numerous forum members. My slight reservation was the appearance of the cables within the engine bay, as they arc from the pedal housing to the inlet manifold.


Mangoletsi cable throttle kit

The kit was ordered from SNG Barratt before the engine had been installed in the car which made the initial fitting of the components much easier! Although the completed inlet manifold and carburettors would be removed as a completed unit to fit the engine from underneath.

The kits are very well made and came in four clearly marked bags, and with detailed instructions. Most of the components are already fully assembled and pre-set so the installation is very straightforward.

The system uses twins cables to balance the load on the levers, providing a smoother operation, and the cables were the only components that would have to wait until the engine was in situ.

The first bag contained a linkage plate and gaskets which simply fits between the carburettors and the inlet manifold. The gaskets used are thinner than standard to compensate for the added thickness of the plate. The carburettors are re-fitted and then the kit’s spring carrier bracket is attached to the linkage plate. Pre-fitted to the bracket are the adjustable outer cable abutments which would be adjusted during the final set up.

Thinner gaskets are used Carburettor linkage plate

The carburettor’s standard SU throttle levers are replaced with ‘aircraft standard’ rose jointed levers, which have a quality feel to them, with a smooth and precise operation and no free play. The top rose joints are bolted to their respective levers on the shaft of the linkage plate. The only slightly fiddly part of the installation was synchronising the operation of the three carburettors. Although this was adequately covered in the instructions.

The kit’s spring carrier Hex adjustment for rose jointed tie rod

A jig plate is used to lock the linkage to a datum position to fit the rear rose joint tie rod, which has been pre-set to a length of 21mm. The front and centre tie rods are then fitted in turn and their lengths adjusted so the brass throttle plates all close at the same time.

An entirely new pedal housing is also included which allows the pedal position and length of travel to be adjusted to suit. Although it has been left at the pre-set 40mm of travel for now. Any fine adjustments will have to wait until the car is completed.

I should have been expecting it …. I then hit a major snag. It was all going far too well up to that point!!

When the pedal was depressed, the top of the pedal lever fouled the starter relay mounted on the bulkhead. I thought the relay may have been incorrectly mounted but old photos confirmed the relay was in the correct position. The new pedal housing was the problem!

Even mounting the relay on the wrong side of the bracket didn’t solve the problem. In fact it made it worse! The lever now just hit the relay bracket instead but also, it was then impossible to connect the wires to the relay. The reservoir bottles were in the way!

Early photo confirms correct position Relay mounted the wrong side But now the accelerator
just hit the bracket

In the end I contacted John Mangoletsi to find out why I was having problems fitting it. He was most helpful and was unaware of this issue, as it had not be reported to them before. A different kit is produced for 3.8 and 4.2 models and each has to be compatible with all the in-flight changes that Jaguar made at the factory.

It soon dawned on me that the relay position had changed right at the end of the S2 production run, as I found out when my wiring puzzle was solved. The relay moved to the engine bay bulkhead with the introduction of the ballast resistor. An additional relay loom was also added to wire in the relay in its new position. A loom that took ages to track down.

John Mangoletsi indicated that the kits were specifically designed to fit all the models and were sold as such. He kindly offered to visit to see the issue in person and come up with a revised solution for mounting the relay. One that could then be offered for the (few) cars which had a ballast resistor.


Starter relay relocated to its
original pre-Ballast resistor
position under the A-post

At this stage I realised I was being a bit dim! I already had the solution: the other change I was making was the EDIS Megajolt ignition system which removed the need for a coil and therefore the ballast resistor.

I could simply move the relay back to its original position on the bulkhead underneath the A-post and do away with the additional relay loom completely. Problem solved!

The final tasks were to connect up the cables once the engine was in place and tidy up the empty bulhead holes for the original linkage. I chose to fit socket head button screws rather than blanking grommets.

In summary, the Mangoletsi throttle cable linkage is a quality bit of kit and could probably be installed in a day or a lazy weekend. I will have to make a point of driving a standard car so I can feel the difference to make sure it was worth it!

May 262014
 

The weekend had been chosen for attempting to start the engine and the usual additional help was sought, although this time only John from the E-Type International Rescue team managed to secure the necessary leave of absence.

However, before any attempt could be made, there were quite a number of tasks that still needed to be completed; seal and fit the fuel tank, finish off and test the wiring, connect up the battery, connect up the EDIS Megajolt electronic ignition and complete the Mangoletsi throttle linkage to name but a few. Retrospective posts covering these will be added shortly.

The pressure was on! The sealing and painting of the fuel tank was only just completed in time to enable the tank to be fitted the day before. Although I hit a major snag …. it didn’t fit! The mounting points didn’t align with those on the body! The solution was to leave it in place and just connect up the fuel lines for now. It will have to be sorted at a later stage.

The time lost in trying to fit the tank resulted in the wiring and battery tasks not even being started by the morning of the starting attempt. Therefore the fuses for all the non-essential circuits were removed to limit the amount of testing/checking required before starting the engine.

I had permanently wired in a connection for my CTEK battery charger, which has a ‘supply’ mode delivering 13.7v. In this mode the maximum current that can be drawn is limited, enabling the circuits to be tested more safely.

The charger was connected, the ignition switch on and, much to my relief, the fuel pump ticked into action. Rapidly at first and then settling into a slower rhythm.

Moments later, fuel started leaking in numerous places in the engine bay! Power was swiftly cut and the leaks addressed in turn. The first was the fuel line connector which had gone in cockeyed into the filter housing. The fuel inlet pipe was slightly too short which had resulted in the misalignment and cross threading. The only remedy was to re-tap the thread.

The only taps I had were of a dubious Chinese origin that I had been advised were best stored in a bin! Where they now reside. Fortunately we were able to make an emergency trip over to the rather well equipped McLaren factory to re-tap it and allow progress to continue.

Even with re-tapping the thread, fuel was still leaking. The culprit was narrowed down to the new brass connector which had a collar before the thread started. This limited the amount of the thread that was engaging before collar came into contact with the olive. Therefore making it more prone to cross-threading again and the ability to obtain a quality seal against the olive.

At this point I would have given up but John suggested a cunning plan of reversing the fuel filter so the brass fitting would use the undamaged thread. PTFE tape was also applied to the threads to help avoid leaking until a new pipe is made.

The plan worked. The other leaks were due to using aluminium crush washers on the carburettor banjo bolts rather than fibre washers. I suspect this might be a result of the zinc plating not providing a sufficiently smooth surface on the joint fuel pipe and banjo bolts. Some of John’s replacement handcrafted washers worked a treat.

Once the fuel issues were resolved, we needed to make sure oil had been circulated around the engine and sufficient oil pressure had been achieved. The battery was connected to allow the engine to be turned over on the starter motor to operate the oil pump. However the plugs and coil pack leads were removed to stop the engine starting.

There was no reading on the oil pressure gauge so we started to suspect the oil sender might be a fault. It was removed from the engine and the Mityvac vacuum/pressure pump (normally used for bleeding the brakes) jury rigged to check whether it was working correctly. It was and was measuring accurately, although with a fair amount of lag.

An oil pressure of about 18-20 lbf was finally achieved after running the starter motor in spurts for a while. A few from the E-Type forum confirmed that this should be sufficient to start the engine. The carburettors were adjusted to their default starting position: the damper oil levels checked, the slow running screw fully screwed down and then backed off two full turns and the mixture adjusting screws unscrewed to set the jet flush with the bridge before turning them each down by 2 1/2 turns.

So, for the first time in 18 years, the key was turned to start the engine …. it started on the first turn of the key!!


The only remaining problem is some airlocks in the coolant system which caused the coolant to be expelled from the expansion tank once the engine was stopped. Although I’ve found this is not uncommon.

 Posted by at 10:46 pm
May 082014
 

The pipes hadn’t fitted first time (probably due to an oversight on their part) but you can’t fault PD Gough’s after-sales service. The problematic tail pipes were returned within a couple of days.

They had replaced the section of the tail pipe, which needs to slide over the silencer exits pipes, with a larger diameter pipe. These now fitted easily and snugly onto the silencer pipes.

One of the other issues was the geometry rearward of the silencers. The problem was the mounting brackets on the resonators were approx. 4-5 inches below the rear exhaust hanger bracket.

The returned pipes had reduce this to about 3″ so significantly less force was now required to raise the resonators to be attached to the hanger.

I’m still not 100% happy with the fitting as the rubber mounts are still subject to the fitting loading but it will do for now. When just the tail pipes had been refitted, they had a clear downward slope when they should be running horizontally under the IRS.

I think the remaining alignment problem is either due to the angle of the pipes exiting the silencers or the initial upward bend of the tail pipes. The latter will be easier to make so I’ll do this once the engine is up and running.

Apr 292014
 

The trial fitting of the exhaust system had highlighted a couple of alignment issues. The geometry of the pipes to the rear of the silencers was amiss somewhere. The result was that a considerable amount of force was required to push the resonators up sufficiently so they could be attached to the rear mounting.

This in turn raised the rear of the silencer on their mounts so one of the exit pipes was in contact with the floor strengthening panel. This was made worse because the silencers were not welded centrally on their mounting straps.

Also all the load would have to be borne by the small flexible rubber mount, which is merely to stabilise the rear of the exhaust system and not designed to take much load. I don’t think it would have lasted 5 minutes out on the road!

At the time, the down pipes from the manifold hadn’t been fitted. So the makers, PD Gough, suggested everything would be brought into alignment once they were fitted. I was far from convinced. So it wasn’t too much of a surprise that the exhaust system didn’t fit once the engine was installed and the down pipes were in place.

The issue was now getting the entire system back to them to sort it out. I thought it would be easier in the long run to make the 300 mile round trip to be able to discuss the issues in person. To their credit, they were very helpful and offered to remake the tail pipes that pass under the rear suspension and remount the silencers to their mounting straps.

They also showed me around their workshops and the many 1,000s of original exhausts they use for templates. I suspect my fitting problems were simply because of the compounded effect of a couple of the bends being slightly out.

Fast forward several months; the underfloor heatshields had been fitted, the damp winter weather had passed enabling the touching up of the chassis rails where the chassis had been mounted to the painting rotisserie and the final adjustments made to the handbrake.

It was finally time to fit the exhaust in preparation for starting the engine.

The downpipes and silencer sections fitted without any major issues. Although I’m slightly concerned about the clearance between the rear down pipe and the torsion bar. Next to be fitted was the re-made tail pipes …. they wouldn’t slide over the exit pipes from the silencer section. Aaaargh!

The silencers were removed to see what was going on. The silencer exit pipes had an outer diameter of 45mm yet the tail pipes had been made from 44.5mm piping with a wall thickness of 1.2mm. So the internal diameter was almost 3mm too small – they’d forgotten to swage the pipes to accept the 45mm pipes.

These are meant to slide into …. …. these. I don’t think so!!

I can’t believe they hadn’t bench fitted it when it was re-made. Perhaps they overlooked this step in the rush to turn it around on the same day. Rather frustrated, I took the offending pipes to a local exhaust fabricator to see if they could open out the pipes rather than return them again.

Unfortunately their view was that the swaging could easily cause the pipe to crack due to the combination of a relative thin wall thickness of 1.2mm and the fact that the expansion slots had been cut at the ends of the pipe could.

Reluctantly the tail pipes have been returned to PD Gough to fix. So the starting of the engine must wait for their return.

Sep 192013
 

It has only been just under a month since the rear suspension was put in, in which time the weather has started to turn, with leaves falling and a persistent dampness on the ground. The hope was to recruit John and Martin again to put the engine back in and set up the front suspension. However doubts started to creep in whether a leave of absence would be forthcoming from their higher authorities.

Still we pencilled in the last weekend in September for the engine install just in case permission was granted! It was the last free weekend before the clocks change but the problem would be if the weather wasn’t favourable on the day. The next available weekend would not be until early December.

I decided it might be better to go it alone earlier, on the next fine day, but keeping the September weekend as a reserve. So the BBC weather forecasts were monitored for a suitable, sunny day. A whole day with only light cloud cover and sunny spells was forecast, so last minute arrangements were made to have a days leave to finally install the engine and front suspension.

The original plan was to remove the front ‘picture frame’ and simply wheel the engine into place and then refit the frame behind it. I should know by now that nothing is ‘simple’ when rebuilding an E-Type! As the rear suspension had taken all day and we’d run out of time, the revised plan was to install the engine from below. The same way it had been removed.

At least this time, the engine was on a low trolley so the front of car wouldn’t have to be raised quite as much to gain the necessary clearance. The positioning of the engine within the frames went without a hitch and the trolley castors made fine adjustments in its position a breeze.

Although there was almost a numpty moment as the engine was being rolled into position – it generally helps to have the propshaft fitted before the engine goes in!!

The car was then lowered until the front fulcrum mounts could be supported on axle stands, enabling the lifting frame to be moved and redeployed to lift the engine on to its mounts. The clearances around the bellhousing are quite small, especially round the torsion bar mounting points, so the lowering progressed very slowly to ensure the paintwork wasn’t damaged.

Lifting the engine was an equally slow process for the same reason. It was also very marginal whether the lifting frame would have sufficient height due to generous length of the lift strop. Fortunately there was, but only by a centimetre. It would have been possible to shorten it by putting a knot in but I suspect it wouldn’t have come undone once the full weight of the engine had pulled it tight.

The gearbox mounting bracket and damping spring, which sits in two rubber mouldings
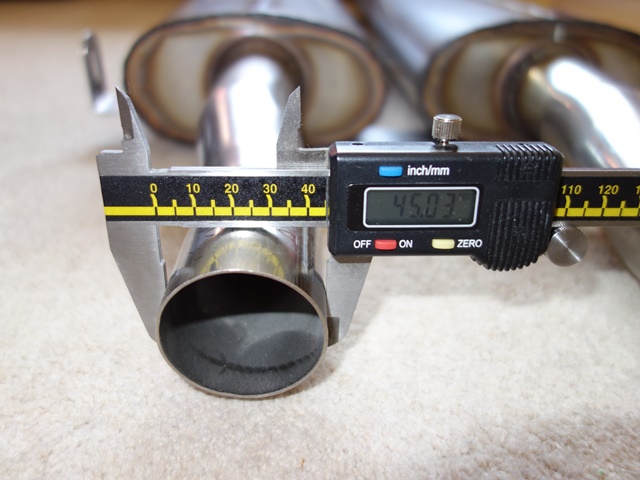
I had wrongly assumed that once the mounting brackets had been fitted to the engine, the weight would naturally align their bolt holes with the engine mounts fixed to the frames. After a considerable struggle, not dissimilar to the fitting of the rear suspension, everything was lined up and the front engine mounts could be secured.

A strong spring sits between the gearbox and the rear mounting bracket to dampen the vibrations of the engine. Fortunately is was only a matter of jacking up the bracket to compress the spring sufficiently to get the bolts in place. Although some care was taken to make sure the spring was located centrally on the trolley jack.

There’s very little room to get in to fix the engine stabiliser so it’s a fiddly jobI thought it would be easier to fit the central engine stabiliser once the engine was in place, as it’s one thing less to keep an eye on when the engine is lifted. It’s was fiddly job as there’s very little room between the engine and the bulkhead to get your fingers in. I think I’d prefit it next time.

Once again the progress was considerably slower than hoped although this was partly due to the accuracy of BBC weather forecasting – light drizzle and grey skies were the order of the day. As dusk approached, the installation of the torsion bars was abandoned for now.

The radiator and cooling fans had already been built up so these were quickly bolted on before the bonnet was refitted. It was time to wheel it inside and head off to the pub for a celebratory meal …. so it wasn’t the best time to find out that the bonnet no longer closed. Something was stopping it about 2 inches short of the landing rubber.

It wasn’t a solid contact you’d get between two hard objects. It was more springy. Some of the wiring looms still had to be re-routed so these were moved well out of the way. Still no joy. The problem is that is almost impossible to see into the engine space when the bonnet is almost full closed.

It can only be one of two things as the engine and radiator were the only items fitted but at the moment I’m stumped. Some padding has been inserted between the bonnet and bulkhead until I can it work out!!

Repairing the plenum chamber

 Air Filter  Comments Off on Repairing the plenum chamber
Sep 062013
 

Ropey would be an understatement when describing the plenum chamber. It appears that it was manufactured by bonding two halves together as, once the superficial layers of dirt were removed, cracks were found along the joining lip between the top and bottom halves.

Also, for some unknown reason, a previous owner had drilled a 3/4″ hole in the underside and, looking at it, presumably while blindfolded.

The first thing to do was to remove all the grime and paint in order to make repairs. I was a little bit apprehensive about using strong paint strippers such as Nitromors as I’d heard it damaged fibreglass. Then someone recommended using Fairy Power Spray – I think it’s one of their oven cleaning liquids!

I must admit I was rather sceptical to sat the least. Still, the oven needed cleaning, so if it didn’t work, it wouldn’t be wasted! To my amazement it acted as a very mild paint stripper. Whereas the paint starts to bubble up within a second or two with Nitromors, the Fairy stuff took 5-10 minutes and needed 5-6 applications to remove all the paint.

I guess it shouldn’t have been too much of a surprise as it is designed to cut through oil and grease. The original paint would have been oil based and presumably traces of oil are retained even once the paint has dried.

The air intake brackets were drilled out to provide better access for the repairs or, probably more truthfully, a case of shipwright’s disease. At some stage the brackets must have been painted silver as underneath and in areas that were not visible they were painted black.

I decided to make a fibreglass repair rather than just use filler. The main reason was an attempt to strengthen the join where the two halves had started to come apart, at each side of the opening. The repair sections were built up with three layers of fibreglass which should be sufficient. The mystery hole was also covered over at the same time.

It was then just a case of filling all the various cracks, chips and the repaired hole with Isopon filler before spraying the plenum and air intake bracket with numerous coats of silver Hammerite.

One thing I’ve found with Hammerite paint from painting the wiper motor housing, is that it takes many months to fully harden. Even though it’s dry enough to handle, it’s still quite easy to damage the soft finish for quite some time. Overall I was quite pleased with the end result.

Trial fitting the exhaust

 Exhaust  Comments Off on Trial fitting the exhaust
Aug 242013
 

The exhaust system is another area where there are a plethora of options available and with them, opinions on which is best. These range from a standard bore with cast manifolds through to straight through, big bore pipes with either long or short tubular manifolds and all combinations in between. Advice often just reflected what the owner had decided to put on their car rather than comparative tests.

The Classic Fabs long tubular manifolds
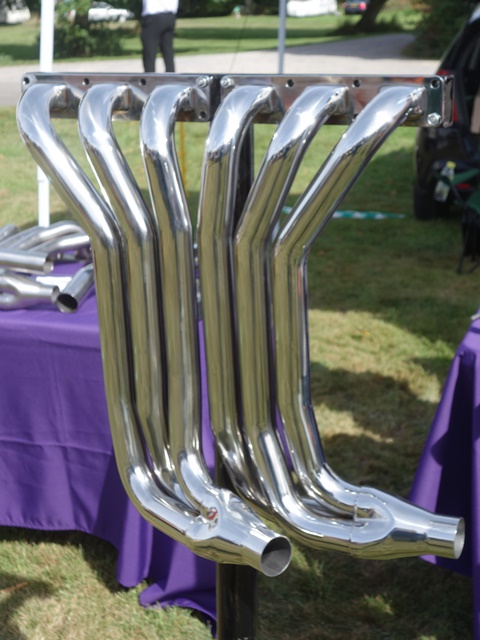
It was tempting to go for one of the tubular manifold systems from companies like Classic Fabs, which are a work of art.

However the administrator of the E-Type forum had done a fair amount of research backed up by practical experience, having fitted most of the different types available.

The general consensus from the forum discussion was that the original cast iron manifolds were very well designed; providing optimised gas flow to speed up the exhaust gases therefore improving low down torque but also heat management. The larger bore systems, specifically when used for the secondary pipes, can result in a torque dip lower down in the rev range.

The other issues are that they are more prone to grounding and tubular manifolds generally radiate far more heat which is then likely to cause other problems, such as brake issues due to the proximity of the brake servo and blistering of the paint work.

The Mikalor style clamps were used instead of the typical U clampsIt therefore seemed sensible to stick to the standard cast iron manifolds and 1.75″ bore system, which was purchased from PD Gough based in Nottingham.

I’d also decided to deviate from the original look at the rear after seeing others who had successfully avoided the slab-like appearance by removing the rear, brushed aluminium panel. The car will be fitted with a long rather than square number plate which enables straight exhaust resonators to be fitted instead of the standard S2 splayed ones.

The final decision to make was whether to have the system made in mild steel or stainless steel. Apparently mild steel gives a much nicer exhaust note but in the end I went for stainless for longevity. Another recommendation that I also adopted was to fit Mikalor style clamps as they apply the clamping force more evenly and avoid distorting the pipe joints.

Some ‘reject’ manifolds were picked up quite cheaply at the SNG Barratt open day – they had some tiny imperfections in the vitreous enamel finish which I still struggle to find. This finish was never very robust and had a tendency to crack and flake off. So I’m expecting it won’t last too long and will need to be removed in order to paint/treat the manifolds.

The engine installation weekend was fast approaching so I decided to trial fit the exhaust system. At this stage, without the engine in place, all that could be trial fitted was from the muffler section backwards.

The combination of not having the down pipes installed and the car being on axle trolleys meant it was extremely difficult to build the exhaust on the car. The pipe ends were unblemished so the system clearly hadn’t be bench fitted when it was manufactured. Therefore all the joints were still very tight even with a generous coating of Copperslip.

It was necessary to build the system off the car to have any chance of aligning the brackets on the intermediate pipes and to push the resonator pipes fully home to be able to mount them onto the rear hanger.

It was then fitted as a single unit, first fitting the muffler section to the four rubber mounts fixed along the chassis rails. I was struggling underneath the car trying to hold up the exhaust up to the mounts while feeling for the 1/2″ spanner that I’d dropped when I noticed I had an audience – a metre long grass snake was observing my progress a couple of feet away. I assume having taken refuge from the hot, sunny weather.

Mounted centre muffler section My new helper! Resonator pipes mounted at rear
The muffler section fitted fine .... until the resonator pipe were mounted which caused it to rise at the rear A grass snake had sought shelter from the hot, sunny weather The resonators had to be pushed upward with a fair amount of force in order to attach to the rear mount

The connecting brackets between the intermediate pipes and the resonators were all fixed so the whole exhaust was now quite rigid. The muffler section was already mounted but the resonators needed a reasonable amount of effort to push them up to reach the rear exhaust hanger. In doing so, it caused the muffler section to raise significantly at the rear so the output pipes hit the rear floor stiffener.

The output pipes from the muffler section foul the rear floor stiffener so something's amissIt didn’t seem right because the small rubber mount at the rear would be under considerably more stress than just supporting the exhaust’s weight. Apart from varying how much overlap there is in each joint, there is no other scope for adjustment and the geometry is fixed so, without modification, the pipes would almost certainly foul the rear floor stiffener.

I emailed PD Gough with the photos above explaining the issues I was having and the purpose of the trial fit was to ensure it fitted correctly before the engine installation weekend. I didn’t want to find out it didn’t fit during the installation weekend and therefore stop the testing of the engine.

I felt their response was more of a fob off and so wasn’t too impressed – “they’d never had any fitting issues before and would be surprised if I had fitting problems once the front pipe are fitted as they would generally bring the system into alignment”.

Personally I’m not convinced because the front pipes are flexible and so their ability to bring the whole exhaust into alignment would be limited. Also the forcing of the muffler section towards the horizontal to stop the clearance issue will only add to the stress on the rear rubber mount.

I’m going to be extremely annoyed if I end up having to ‘surprise’ them by informing them it doesn’t fit.