
Sound Insulation
The original sound deadening was provided by thin, perforated sheets of a bitumen type substance. I’m not sure if this is still available but there are a number of alternative products available, all of which have self-adhesive backing. Essentially all a sound deadening material does is add mass to the panel to stop or reduce its tendency to resonate. The more mass, the greater the sound deadening.
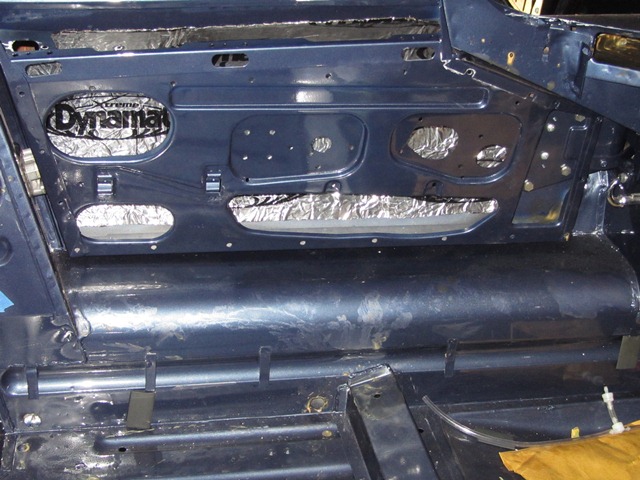
The product I decided on was Dynamat which is 1.7mm sheets of butyl rubber, covered in a metallic sliver foil to reflect heat. It normally comes in 18″ x 32″ sheets which can easily be shaped with a Stanley knife. Quite a few have used it in restorations covering the whole floor, footwell and transmission tunnel areas to stop heat soak from the engine bay into the cabin. Although I wasn’t convinced of its suitability for heat insulation and so will only be using it for sound deadening, in the following areas:
- Door skins
- Rear bulkhead in cabin
- Boot floor
The only difficulty was the door skins due to the limited access. A paper template was used to obtain the shape necessary to cover the door skin, leaving an uncovered 1cm strip around the perimeter. This was to allow the waxoyl to seep as far into the door frame to door skin joint as possible.
 |
 |
 |
The main mistake I made was to try to cover the area high up on the leading edge of the door, above the hinge area. There’s barely enough room to get the sheet in so the backing had to be removed before it was put into position. So it naturally stuck to the surrounding areas as it was manoeuvred into place.
I’m not sure whether it is a good idea to use Dynamat on the vertical panels coming up from the floorpan as these will be trimmed with moquette, which is quite thin so the imperfections (creases) in the Dynamat may show through. I’ll decide later when I come to install the trim.
Heat Insulation
The reason why I wasn’t convinced about the Dynamat for heat insulation was that the reflective layer was innermost – ideal if you wanted to retain heat within the cabin but possibly not that effective against heat soak from the engine bay.
 Another product on the market is Koolmat which looked far more promising. It’s woven glass fibre covered with a grey, cured silicone layer and is designed as a barrier for conducted heat. Being quite dense, it also act as a sound deadening layer.
Koolmat is much cheaper in the US and, as luck would have it, a relative was coming over so I asked if they would be able to it back for me. I think it took up almost half of their luggage weight allowance!
The Koolmat kit for the E-Type contains 20 pre-cut pieces and some high temperature silicone sealant. The white glass fibre side is bonded to the car body with a high temperature contact adhesive and the sealant then used to seal the butt joints where two pieces meet.
A short time after, I was dropping the seat frames and centre console off at Suffolk & Turleys. They had come across Koolmat but weren’t too keen on it, as it’s difficult to get anthing to bond to cured silicone. I had a similar reaction from Andy when I dropped into Hutsons.
 Now I was really concerned that I’d gone for the wrong product. However one of the knowledgeable folk on the E-Type forum suggested it was a good product and they didn’t have any problems.
However I wanted to make sure it would be possible to bond the underfelt to the silicone side before even considering installing the Koolmat.
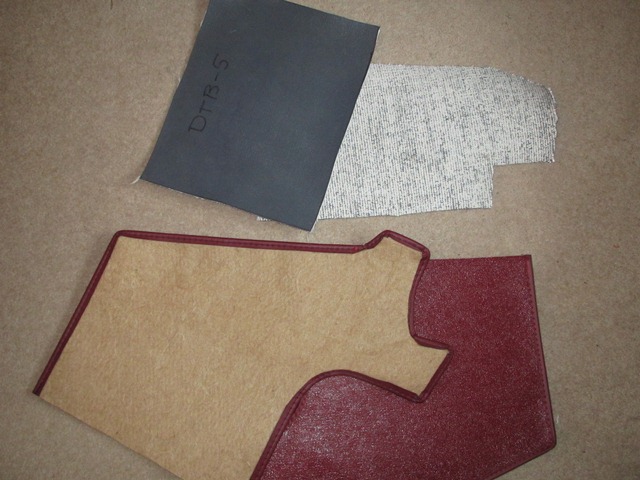
 Several phone calls later to get advice from various adhesive companies and it was time to perform a comparative test. Off-cuts of jute and Koolmat were used to test the bond for number of different adhesives and sealants.
The best by a significant margin was your standard bathroom silicone sealant! I guess that shouldn’t have been such a surprise – the only thing that sticks to silicone is silicone!
The image, above right, shows problem of bonding to silicone. It shows the test of Alphabond AF178 contact adhesive verses the eventual winner, Allbond Silicone Sealant. The Alphabond AF178 is the contact adhesive that will be used for bonding the glass fibre side of the Koolmat to the body. However when used on the silicone side, it simply peels away from the silicone. With the sealant, the bond is strong enough so the fibrous jute fails before the bond.
So a clear (rather than bathroom white!) Allbond Silicone Sealant will be used to bond the interior trim to the Koolmat. I’ll cover this at a later stage.
I’m also planning to cover the area in the engine bay around the gearbox and transmisssion tunnel with the Zircotec I heatshield material. With luck, this should reflect much of the exhaust and engine heat back into the engine bay.